Wednesday, May 30, 2012

Tintypes!

I got five wonderful and wonderfully tiny tintypes from Genevieve at Boxlots on Etsy.com.  These lovely little tintypes were probably originally intended to be put into a locket or some similar keepsake item.  Each one measures approximately 1/2" x 3/4".  I couldn't bear the thought of framing them and losing all that great metallic feel.  Just sticking them to the wall didn't seem like a good solution, either.  So I decided they needed little easels.  Does anyone sell teeny, tiny little easels?  Of course not.

After a couple of failures, I eventually came up with a prototype that was workable.  Here's the result.  Let me know if you recognize anyone in the pictures!


Monday, May 28, 2012

Shady Deals

I wanted window shades for my 1930's-ish museum and started going through the catalogs.  Everything I saw looked kind of clunky -- too much fabric, too much trim, the shade pull was too big, the pull cord didn't hang straight. . . . So I set out to make eight window shades.  Here's how it went. . . .

I cut the fabric using a precision cutting wheel on the cutting mat in the picture, along with a straight edge.  Then I used round toothpicks to make the lower dowel in the shades.  Once the glue was set, I clipped off the ends of the toothpicks so the ends were flush with the fabric.

To make the upper rod, I cut even sections of some tiny dowelling and then dipped the ends in silver paint to simulate the end caps.
To center the shades on the rods, I put a couple of pieces of painter's masking tape on my cutting board.  The shades are 2" wide, so follow the lines on the board, while the dowels fit between the tapes.  That way I didn't have to make any marks on the dowels.

All eight shades (the smaller one goes in the third floor window) with both top and bottom dowels installed.

These will eventually be the shade pulls.  I looped thread through jeweler's jump rings, twisted the two ends of the thread tightly together and coated the doubled, twisted thread with PVA glue.  I could have used Alene's, but the PVA is more fluid and easier to apply.  Then I pinned the assembled pieces over wax paper to set up, stretching the thread so that it would dry straight.  Once they were set up and off the board, I cut them to even lengths and used gesso to paint the pull rings white.
 
And here they are!  Each shade is six inches long, so it can be rolled up or down to give the desired effect.  I've attached them to the window frames with museum wax.  While it would be great to have actual hardware, I haven't yet solved that little problem.


Tuesday, May 22, 2012

Even in the Dark. . . .

Even in the dark, the museum will be welcoming to visitors.

The addition of doorstep, an entrance sign, and lights make the scene more welcoming.


Monday, May 21, 2012

Things Are Coming Together

Once I got the pot-bellied stove, I realized that it needed to have some heat-deflecting tile around it.  Here the tile is in place and I've roughed up the framing.

The framing has been stained and installed.  Now I'm trying to figure out how to arrange furniture.  It's a bit of a problem since I'd like to add a cot and maybe a small dresser, as well as shelves for dishes, pots and pans, etc.  One idea I've had is to add a wall to the left of the tile.  What do you think?

Five frames built and filled!  One of the images is a reproduction of that famous first photograph made by Joseph Nicephore Niepce.  A pat on the back to anyone who can tell me which one it is.  Also, which one is the Daguerreotype and which is the Talbotype?

Two more frames ready for filling.  Sadly, I've now run out of picture frame stock and will have to wait for my order from www.miniatures.com to arrive.

Wow!  There's now enough finished to do a little bit of installing!  I'm using museum wax to "hang" the pictures so everything is interchangeable and none of the surfaces is damaged.  On the table, there's a stereopticon along with some stereo photographs, a small pile of antique tintypes, and a lovely little bellows camera.

And a peek through the window. . . .

The museum goes for an outing by the fish pond.

The roofers were here, and the sign has now been installed in that odd, blank space on the third floor.


I put a few bits of furniture in so give a better idea of where I'm going with this idea.

The ground floor will be the main gallery space, with a studio/gallery above it.  The pictures resting on the window sills are actual antique tintypes.  They were probably originally intended to be set into a locket, but are the ideal size for my museum.

The top floor will be a loft, with some nice appliances from the 1930's.  And notice the museum's new mascot -- a sweet, old Sharpei.

Sunday, May 20, 2012

Magic Words of Poof Poof Piffles. . .

. . . Make me just as small as Sniffles.

Does anybody recognize that little rhyme any more?  It was from my favorite comic book when I was growing up -- Mary Jane and Sniffles.  When I was in college, word went around that the comic book was actually about marijuana and cocaine, but I can tell you that, for the average 8 year old, it was about the idea of becoming very, very small.  Mary Jane was a little girl and Sniffles was her mouse friend.  Whenever she wanted to become very small so she could find out the truth about something, she said the words:  Magic words of poof, poof, piffles.  Make me just as small as Sniffles.  And POOF! she'd become mouse-size.

Turns out, the fascination with things tiny is simply a part of my psyche, and now that I've got time, I'm exploring that part.  When I showed someone a few pictures of my latest project, The Red Door Museum (An Historical Archive of Photography from Niepce to Now), she suggested that I start a blog about the process.  "Hm!"  I thought.  "I've already got a blog.  And it just happens that it's about photography.  Why not add my little gallery?"

So here it is -- not exactly from beginning to end, but more like from the beginning of the somewhat recognizable stage to wherever I am in the process at any given time.  So now, say it with me:  "Magic words of poof. . . ." well, you know the rest. . . .

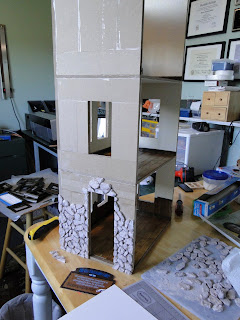
The shell is complete, along with interior paint and wainscoting.  Now I'm adding field-stone to the exterior.


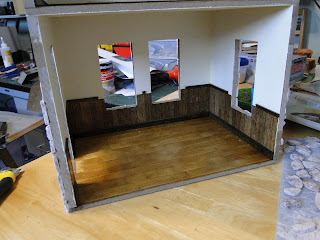
The bottom floor interior with oak flooring.  The windows can't go in until the exterior finish is completed.

With the field-stone applied and the rest painted, the windows have been installed.  Now I'm adding fascia boards and corner trim.

The red door had to wait a bit to be installed so I could add the doorknobs -- much easier to do this before the door is installed.